Plant. Tend. Harvest. Enjoy!

February 20, 2013


Pear-Almond Crisp


Apple crisp is a delicious and adored fall staple.  As you can imagine, I make my fair share of apple crisps in the fall. And apples are great, not just great, amazing and scrumptious.  You would be hard pressed to find someone who loves apples more than myself, BUT I do find that there is an injustice in the “pome fruit” world. If you haven’t noticed, pears are apples’ sad redheaded nerd cousin, perfectly pleasant, but not as popular.  Pears just can’t seem to compete.  So when I first made pear crisp, I was a little surprised at the response it received.  My family actually seemed to prefer pear crisp to apple crisp.  “Amazing” I thought to myself, pears finally catch a break.  So this is the recipe for the crisp that boosted the self esteem of pears everywhere.

For the filling:

5 large Comice pears (cut into bite sized pieces)
2 Mutsu apples (cut into bite sized pieces) –to give the crisp some structure
3 Tbsp cornstarch
2 Tbsp brown sugar
2 tsp ground ginger
1 tsp cinnamon

For the topping:

½ cup salted butter (melted)
½ cup rolled oats
1 cup flour
1 cup almond meal
¾ cup sugar

Preheat oven to 375 degrees.  Mix all ingredient of the filling in a large bowl, making sure that cornstarch is evenly distributed.  Then place mixture in a 13x9 baking dish.  Prepare the topping by melting the butter and then stirring in the rest of the ingredient, and then place on top of the filling.  Bake for about 40 minutes.  Serve warm with ice cream.


February 23, 2012

Meyer Lemon Tart and Pavlova topped with Berries


Meyer Lemon Tart and Pavlovas with Mixed Berries

So, it has been a while... I’ve been doing some major slacking when it comes to this blog. My Uncle Tony has kindly pointed out quite a few times that I need to shape up haha! So it is only fitting that on his birthday, February 20th, I made these two desserts to post on the blog. I am cheating a little bit here by using fruit that isn’t from our farm, but sadly everything we had from this year is gone, and my frozen fruit stash was claimed by the second power outage of 2011, thanks a lot Winter Storm Alfred.

I have always been curious about meyer lemons, they seem so fancy and exotic. Meyer lemons are thought to be the result of a cross between true lemons and either a mandarin or an orange. I was therefore under the impression that they would be a sweeter lemon than I was used to, however that wasn’t my experience. Perhaps meyer lemons are supposed to be sweeter, but I am not in the best situation geographically to experience them at their finest. Sour as they were they did make a beautiful tart!

This tart, which calls for quite a few egg yolks left me a good deal of unused egg whites. I am from a family that wastes not, and so I couldn’t just toss the unused whites, but instead decided to make something I have only had a handful of times, pavlova, or meringue. Meringue topped with berries is a surprisingly satisfying dessert, you would think that egg whites and sugar wouldn’t make anything too special, but you’d be wrong. The crunchy exterior coupled with the pillow-y center of a meringue is wonderful, it reminds me of cotton candy, but with more texture, it is like cotton candy for adults, if you will. So I hope you will give these two special desserts a try!

Meyer Lemon Tart

Crust: (is adadpted from the SoNo Baking Company Cookbook)

2 cups flour
1 cup unsalted butter at room temperature
⅓ cup sugar
½ tsp salt
1 large egg
1 large egg yolk

Filling:

7 large egg yolks
2 large eggs
1 cup sugar
zest from 2 meyer lemons
⅔ cup meyer lemon juice
½ tsp salt
4 tbsp unsalted butter (cut into 4 pieces)

To make the crust add butter, sugar, and salt into an electric mixer with a paddle attachment, cream together until light yellow and fluffy, about 2 minutes. Add egg and egg yolk to the mixture and beat until combined. Lastly add flour and mix until all flour has been moistened. Scoop dough out onto the counter and form into a cohesive disc, refrigerate until firm about 45 minutes to an hour. Preheat oven to 350 degress. Once dough is firm roll out to desired thickness and fit into tart pan, make sure to prick the bottom with a fork. Bake for 12-14 minutes or until golden brown.

For the filling, whisk together egg yolks and whole eggs in a medium sauce pan, add sugar, meyer lemon juice, zest, and salt, and set to medium low heat. Once warm add the butter, and allow to melt. Cook on medium low heat until the mixture thickens slightly and holds on to the wooden spoon (should be about 170 degrees). Strain mixture through a metal seive and place mixture in cooked tart shell, put back in the 350 degree oven for about 10-15 minutes, until the center of the tart sets. Top with berries and enjoy!


Pavlova

7 large egg whites (reserved from the tart, and at room temperature)
1 tbsp corn starch
½ tsp cream of tartar
1 ⅓ cup sugar

Preheat oven to 300 degrees. In the bowl of an electric mixture combine egg whites, corn starch, and cream of tartar. Using the whisk attachment, whisk first on low speed and then gradually increase speed at the frothiness of the eggs increases, whisk until soft peaks are reached. Slow the speed of the whisk, and add sugar, whisk again on high speed until firm peaks are reached. Take a baking sheet lined with parchment paper and make six large mounds with the egg white mixture, creating a small indentation in the center of each. Place in the oven and immediately reduce heat to 250 degrees, bake for about 50 minutes, turning once in the middle of baking. Remove from oven and allow to cool, then top with mixed berries and enjoy!


May 4, 2011

Strawberry Rhubarb Pie


Sadly, I’ve been on a bit of a fruit hiatus! But thankfully we have a small patch of rhubarb that is just perking up, so I decided to make a spring classic: strawberry rhubarb pie. I have always loved rhubarb, and this combination is especially delicious, the tart rhubarb goes very well with the sweetness of strawberries.


Rhubarb is a wonderful plant to have in a backyard garden. With a half a dozen plants you have more than enough rhubarb for a few pies, and possibly even some left over for freezing! What is even greater is that this particular plant is a perennial, so it can be a permanent part of your backyard. Rhubarb is relatively low maintenance but requires a little bit of TLC in the spring, like thinning out the plants to avoid overcrowding and a little fertilizer or compost around to help them grow nice and tall for you.

Rhubarb leaves are said to be toxic, so when trimming your rhubarb make sure to dispose to the leaves in a place where your pets can’t get into them.


Strawberry Rhubarb Pie


For Filling:

1 pound of rhubarb (washed and trimmed of leaves, cut into ¼ inch pieces)

1 pound of strawberries (washed and trimmed, cut into thin slices)

1 ½ Tbsp Cornstarch

½ cup sugar


For crust:

2 ½ cups flour

1 tsp salt

1 tsp sugar

1 cup unsalted butter (chilled and cut into small pieces)

4 Tbsp ice water


Preheat oven to 350 degrees. To make dough, combine flour, salt, and sugar in a large mixing bowl and whisk together. With a pastry blender cut in the cup of butter continue to cut in until the mixture resembles coarse meal. Add the 4 Tbsp of water and try to bring dough together, if the dough is still too dry try adding more water, 1 Tbsp at a time until the dough comes together. Divide dough in two and wrap in plastic wrap and shape into discs. Refrigerate for one hour.


For the filling combine the filling ingredients in a large bowl and mix together, making sure to even distribute the sugar and cornstarch.


Once the dough is chilled, on a floured work surface, roll both discs out to desired size (this will vary depending on the dimensions of your pie plate). Place one of the rolled out discs on the bottom of the pie plate, top with filling, and then cover with the remaining pie crust (you could also cut the second pie crust into strips and form a lattice). Bake in the 350-degree oven for about one hour.


January 25, 2011

Honey Bourbon infused Apple Cinnamon Pancakes


*All photographs were taken by my friend Michelle. See more of her beautiful work at http://michellekmartin.tumblr.com/ *


I recently watched an episode of “Throwdown” on The Food Network that featured blueberry pancakes. It left me with a crazy hankering for some pancakes; instead of the classic blueberry I thought it would be nice to incorporate some of the remaining apples from our harvest this autumn.


We have a few different apples varieties left (Macs, Empires, and Golden Delicious) and all are delicious candidates for the apple portion of these Honey Bourbon Infused Apple Cinnamon Pancakes. I once had an apple crisp that was infused with bourbon, and I was amazed at how well the flavors of apple and bourbon meld together. At the package store I was lucky to find bourbon that was infused with honey (yum!). In this recipe I used the bourbon as a bit of a flavor and also a way to keep my apples from oxidizing and turning that icky brown color.


Some tip for delicious pancakes:

1. Don’t over-mix. Beating the batter until there aren’t any lumps will develop the gluten in the flour and make for a gummy texture to your pancakes.

2. Use a mixture of regular milk and buttermilk.

3. Let batter rest for about 15 minutes before cooking pancakes.

4. Separate eggs and beat the whites into stiff peaks before incorporating into the batter. This will create a fluffier batter and make for tender and light pancakes.


Honey Bourbon infused Apple Cinnamon Pancakes


2 cups flour

1 Tbsp sugar

1 tsp salt

1 tsp baking powder

½ tsp baking soda

1 tsp cinnamon

1 ½ cups buttermilk

1 cup milk

2 large eggs (separated)

Cream of tartar

4 Tbsp butter (melted)

3 medium sized apples (cored and sliced thin)

Honey infused bourbon


Core, peel, and slice apples. Add apple slices to a shallow bowl and pour a generous amount of bourbon over, set aside. Place flour, sugar, salt, baking powder, baking soda, and cinnamon in a large mixing bowl and whisk together. Make a well in the center of the dry ingredients and add in both kinds of milk, egg yolks, and melted butter. Whisk all these ingredients together, but do not over-mix, having some small lumps in the batter is ok. Let the batter rest for about 15 minutes. Preheat an electric griddle to 350 degrees. Put the egg whites and a few pinches of cream of tartar in an electric mixer with a whisk attachment and beat on high until still peaks form, 1-2 minutes. Gently fold egg whites into the rested pancake batter. Grease the griddle with some butter or vegetable oil, and spoon on a desired amount of batter, add apple slices once the pancake is poured. Flip pancakes when small bubbles form on the surface of the batter. With these pancakes, flipping once is desired.


Note: if you prefer thinner or thicker pancakes you can adjust the amount of milk added to the batter.


December 27, 2010

Apple and Cheddar Turnovers


I have a serious affinity for cheese. I love all kinds, and matching specific cheeses with a complimentary flavor can make for delicious treats. I have finally made it home to Connecticut for the holidays and decided that I best make use of some of the remaining apples from the harvest this autumn. And since the flavors of apples and cheddar cheese compliment each other so well, I made apple turnovers with a white-cheddar-infused crust. The subtle flavor of cheddar cheese sneaks up on you, and is a delightful surprise in these flavor packed desserts!


Some people have very strong feelings about baking and eating apples being mutually exclusive. I feel as if this distinction doesn’t have to be quite so rigid. There are certainly some varieties that are better for either baking or eating, but the bottom line is you can probably use whatever you have around, as long as they are of a similar texture and consistency. As long as your apples are equally hard or soft (however you want to look at it) they will bake evenly in your crust.


Apple and Cheddar Turnovers


For Crust:

3/4 cup butter (salted)

2 cups flour

6 Tbsp cold water

1/2 cup shredded white cheddar cheese


For Filling:

5 large apples (I used a mixture of Macs, Empires, and Golden Delicious)

2 Tbsp brown sugar

1 Tbsp white sugar

1/2 tsp cinnamon

1/4 tsp nutmeg

About 1/2 cup shredded cheddar


Egg Wash:

1 one

1 Tbsp water

1 Tbsp milk


Preheat oven to 400 degrees. To begin the crust cut the butter and cheese into the flour with a pastry cutter until the mixture resembles coarse meal. Then slowly add in the water, one tablespoon at a time until the mixture comes together. Form the dough into a disk and set aside. Core and peel your apples. Use the largest side of a 4-sided grater to cut your apples into very thin slices. Add the sugar, cinnamon, and nutmeg to the mixture. Cut your dough into 8 equal segments. Roll each segment into a 6-7 inch circle making sure to thoroughly flour your rolling pin and surface. Pile a generous amount of the apple mixture on one side of each of the circles and cover with some extra shredded cheddar. Take a pastry brush and apply water to the circumference of the dough and then fold in half to create a half moon shape. Press edges together with the teeth of a fork and set on a baking sheet that has been lined with either a silicon-baking sheet or parchment paper. After all of the turnovers have been assembled, make the egg wash by combining the ingredients and beating them together. Brush the outside of the turnovers with the egg wash and then sprinkle with a gentle dusting of cheese. Bake in the oven until golden brown (about 25 minutes).


November 11, 2010

Date and Nut Biscotti


I have found a new obsession: dates. Never having really experienced dates before venturing to Southern California I was pleasantly surprised to realize, I love them. They have a delightfully chewy texture and a sweetness reminiscent of honey.

For my job, I had the opportunity to visit one of the state of California's Agricultural Experiment Stations in Coachella. There they have a date palm germoplasm where they keep several different varieties of date lines going for the USDA. It is something similar to a seed-bank, only with trees instead of seeds. I was able to sample some of the different varieties they grow there. The diversity of date varieties is fantastic. Some are plump and meaty, while some are drier and chewier. Most are light brown, but some are green, some black, and a few are even a beautiful deep purple color. At the Agricultural Experiment Station my boss and I were generously given a large box of Majool dates fresh off the palm trees. I originally intended to make something with the dates I was given several weeks ago, but I ate them all! So after purchasing some dates at the Santa Monica Farmer's Market, on Sunday, I've finally made something delicious that incorporates dates: date and nut biscotti. The biscotti recipe is loosely based on a recipe given to me by my great-grandmother, so you know they have to be good!

Date and Nut Biscotti

1 1/2 cup flour
2 tsp baking powder
1/2 tsp salt
1/2 cup vegetable oil
1/2 cup sugar
2 eggs
1/4 cup honey
1 tsp vanilla
1/2 lb of dates, pitted and roughly chopped
1/4 cup golden raisins
1/4 cup pecans

Preheat the oven to 325 degrees. Incorporate the flour, baking powder, and salt in a bowl, sift together. Add the chopped dates to the dry ingredients and toss so that the chunks are separated from one another and covered in the flour mixture, set aside. In a separate bowl place vegetable oil, sugar, eggs, honey, and vanilla and whisk together. Add the dry ingredients, raisins, and pecans to the wet ingredients and fold together into the batter is nicely incorporated. On a cookie sheet form three "logs" across the sheet that you will bake and later cut into biscotti. Bake the logs for 20-25 minutes until golden brown. Remove from the oven and cut across the short way to create your individual biscotto. Turn the biscotti on their sides, so that the side that was in the center of the log now faces up, and place back into the oven for 5-10 minutes until golden brown on the top. I would recommend enjoying these for breakfast with a cup of tea or a cappuccino!


September 24, 2010

Prosciutto wrapped Fig Pizza


So last weekend was my first real weekend looking for goodies at the Downtown Riverside Farmer's Market. I had been there the previous Saturday but had been late and missed out on some things, sad. In general, I have to say I enjoy this market! It is in an absolutely gorgeous location (next to the historic and beautiful Mission Inn), there is plenty of convenient parking, and there is a delicious coffee shop and breakfast bistro called Simple Simon which I would highly recommend right across the street. And in addition, the vendors are generally very friendly and ready to answer your questions (some can be slightly pushy, shoving a bag into your hands while you are merely perusing okra- just because I'm looking at okra doesn't mean I need to/want to buy it, sirrr). But as I examined the offerings last Saturday I was looking for something special, something I couldn't grow myself in CT. Interestingly enough there weren't too many things that fit that description, I saw quite a few peaches, plums, berries, etc. But finally! I stumbled upon a gorgeous pint of figs!

I saw a movie once (in my Ecology class at Northeastern) about the pollination process of figs, which is seriously fascinating. Fig wasps lay eggs inside the fig so that when the eggs hatch the larval stage is able to collect pollen from the flowers (which are within the fruit itself, an odd circumstance that has allowed for this odd method of pollination). The larval stages eventually matures and breaks free of the fig fruit. As they fly away to create their own baby wasps they carry with them the pollen from their original fig, which they will deposit in a second fig that they chose to lay their eggs in, thus cross-pollinating the second fig and allowing the cycle to continue. I apologize for the unbridled nerd-ery you just had to deal with there, but please, don't be grossed out. It is not like you are eating insects when you eat figs, and you have to remember that most of the fruit you eat has been up close and personal with some kind of insect pollinator in it's lifetime, albeit not usually to this extent.

But anyway! What I decided to make was a pizza featuring the familiar pair, figs and prosciutto. I used a ricotta cheese mixture instead of tomato sauce and also incorporated some caramelized onions. All these toppings were placed upon a cornmeal crust which is tender and puffy, but also has the right about the "crisp" to it. In my opinion this pizza had a beautiful balance between sweet and salty components. I hope you will give it a shot!

Prosciutto wrapped Fig Pizza

Crust (makes 4 individual pizzas):

4 1/2 tsp. dry active yeast
A pinch of sugar
1 1/3 cups warm water (not hot, just warm)
3 1/3 cups flour
1/2 cup cornmeal
3 tsp. salt
2 Tbsp. olive oil

Toppings:

1 large red onion
1 pint of figs (about 18 figs in total)
6 thin slices of prosciutto
1 1/2 cup ricotta cheese
3 cloves garlic
A hand full of flat leaf parsley
1 1/2 cups mozzarella cheese

Preheat oven to 400 degrees. Cut red onion into thin slices and place over very low heat in a frying pan, onions will reduce by more than half and turn brown (but not burnt). This may take a while, perhaps an hour or so.

In a measuring cup or mug place the warm water, yeast, and sugar and allow to sit for ten minutes, until frothy. In a large mixing bowl combine the flour, cornmeal and salt with a whisk. Create a well in the center of the dry ingredients, add the olive oil and yeast mixture and work with hands to incorporate. Once the ball of dough is formed, pour a bit of olive oil over the top (to help avoid dessication) and place a warm, slightly moist towel over the bowl and allow to sit for 1 hour or until the dough had doubled in volume.

While the dough is rising you can cut the thin slices of prosciutto into thirds (the long way) and wrap each of those strips around a fig. Place on a baking sheet and roast in the oven for about ten minutes, until prosciutto has crisped up.

Once the dough has risen, cut into fourths and shape each fourth into a nice individual pizza crust, allow to rise again for about 20 minutes.

Chop garlic and parsley and incorporate into the ricotta with a bit of salt and pepper.

Assemble pizza, first with crust, drizzle with olive oil and spread all the way to the edges so that that crust will turn a beautiful brown. Top with ricotta mixture, figs, caramelized onions, and mozzarella cheese. Bake in the 400 degree oven for about 12 minutes.

September 6, 2010

Grilled Peach Salad with a Balsamic Reduction


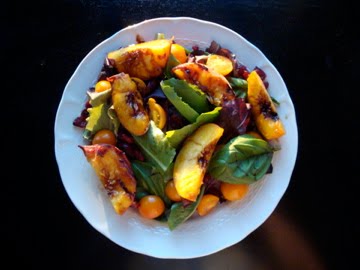
As you well know, before I left for California my family was buried in stone fruit. Plums, nectarines, and peaches galore! As I have previously stated I have a deep and lasting affinity for grilled stone fruit. The following quick salad is an awesome option if you are looking for a cool and simple summer supper. I can't stress enough how much I miss having access to an exorbitant amount of stone fruit begging to be grilled!

Grilled Peach Salad


1 box of spring mix lettuce
1 handful of whole basil leaves
1 pt yellow cherry tomatoes
1/2 cup craisins
4 large peaches
3/4 cup of balsamic vinegar
1 Tbsp brown sugar

Add the balsamic vinegar and brown sugar in a small saucepan and place over medium high heat. Bring the mixture to a boil and all it to simmer until it has reduced by half. While the vinegar is reducing cut peaches in half and separate from the stone. Place peaches stone side down on a medium high grill for about 4 minutes (until tender) then flip to skin side, allowing them to cook for another 4 minutes. Arrange salad greens, basil (which gives off an amazing aroma if left whole), tomatoes, and craisins on a large platter. Place warm peaches on top of the greens and drizzle with the balsamic reduction.

The acidity and sweetness of the reduction is an amazing accompaniment to the grilled peaches. I personally prefer to eat this salad as is, the reduction gives enough flavor for me, but if you care to you can also dress this salad with your favorite balsamic vinaigrette.

As a side-note, I can't give enough praise to yellow cherry tomatoes, they are super sweet and flavorful (and keep in mind this is coming from a girl who very rarely compliments raw tomatoes).


A Journey Westward


I haven't been able to post anything in a while due to a recent move to California! I will be in southern California for the remainder of the year, working at UC Riverside in a plant pathology lab. So in the wake of getting everything together and driving across the country, I have neglected to update my blog. I know, tisk tisk. I created a few last delicious things before embarking on my journey, so I will post them promptly.

What I plan to blog about here in Riverside is still produce/fresh food related. I intend to visit the Riverside Farmer's Market in downtown every Saturday and use the offerings there to create tasty treats!

I took a trip to the market this past Saturday and while the size of the market was impressive, the variety was just so-so. I plan on getting there earlier next week, I might have missed something good by deciding to sleep in; the early bird gets the worm and all that jazz. I won't pass any further judgment about the vendors or the market until I've gone a few times; it is no secret that I'm a fruit snob, so I'll try to keep it civil. :)

To get a glimpse of the cross country journey I took with my friend Michelle, visit her blog at http://michellekmartin.tumblr.com/ !

July 27, 2010

Plum Tart


We have just finished picking all of our Methley Plums (an oriental plum variety) and are looking for homes for them! These tasty, super sweet gems don't last forever, and when it is hot they can burst open, creating quite a mess. The heat causes the sweet flesh inside the plum to expand, which causes the skin to split and the plum to spill juice everywhere (seriously, everywhere). So when we can't sell these Methley Plums in time, we end up throwing quite a few plums out due to this splitting phenomenon, such a waste.

One of our customers owns a restaurant and buys Methley's to make a plum pie. He reminded me that plums are naturally very high in pectin, meaning they don't need a ton of help to thicken once cooked. So I was inspired to take a few of our split plums and make a plum tart! I used Julia Child's recipe for sugar tart crust (from Mastering the Art of French Cooking) for this delicious creation!

Plum Tart

Crust:
1 1/3 cups flour
4 Tbsp sugar
1/8 tsp baking powder
7 Tbsp butter
1 egg (beaten with 1 tsp water)
1/2 tsp vanilla extract

Filling:
1 1/2 quarts of Methley Plums
3/4 cup brown sugar
2 Tbsp tapioca

Topping:
1/2 cup butter
1/2 cup flour
1/4 cup rolled oats
1/3 cup brown sugar
1 tsp cinnamon

Preheat oven to 375 degrees. To make the crust put the flour, sugar, butter and baking powder in a mixing bowl. Combine these ingredients with a pastry cutter or your fingers until the butter is well incorporated. Add the egg and vanilla to the mixture and knead into a ball with the heel of your hand. Shape the dough into a disk and refrigerate until firm. Once firm fit the dough into a 9 inch tart pan. Line the inside of the tart shell with tin foil and add dry beans or rice to keep the center of the shell weighed down, bake for 5-6 minutes. After the 5-6 minutes remove tin foil and beans or rice and prick holes in the bottom of the tart shell (with a fork) and bake for another 8-10 minutes or until it turns golden brown. Remove from oven and let cool.

To make filling, cut plums off their stone and place into a medium sized sauce pan and add brown sugar and tapioca. Cook for about 15 minutes. Take off heat and place into a food processor to smooth filling. Place filling in the cool shell.

To make the crumble topping melt butter and mix in the remaining ingredients. Sprinkle topping over the tart and bake the tart for an additional 10 minutes, until the crumble topping browns.

This tart would be great for dessert or with coffee for brunch!


French Peach Cake


It is peach season! That means our stand is filled with the sweet smell of peaches, a delightful summer scent! This week we started picking Red Havens (which is a classic peach variety). Red Havens are our first "free-stone" variety, meaning their flesh comes cleanly off of the pit in the middle. Earlier varieties of peaches have a tendency to cling to the stone. Once free-stone peaches arrive, it is prime time for peach cake, cobbler, pie, and jam!

I decided to modify a french peach cake recipe from "The Joy of Cooking" by Irma Rombauer. The cake came out a bit more like cobbler than I would have liked, and was a tad sweet, but still very delicious (which was evidenced by its hasty consumption)!

Peach Cake

Peaches:
2-3 cups of peeled and sliced peaches (or enough to cover the bottom of an 8 inch pie pan)
1/2 cup sugar
1 Tbsp flour (for dredging peaches)
A pinch of nutmeg

Cake:
4 Tbsp melted butter
2 cups flour
3/4 cup sugar
2 tsp baking powder
1/4 tsp salt
4 egg yolks
1/2 cup milk

Preheat oven to 425 degrees. Combine ingredients in the "peaches" section of the recipe and place in an 8 inch pie pan, set aside. In a large mixing bowl combine the sugar, flour and salt in a large bowl and whisk. Beat together the butter, egg yolks, and milk and add to the dry ingredients in the large bowl, mix together and pour the cake batter over the peaches in the pie pan. Bake the cake for about 30 minutes, the cake will turn golden brown. The cake can be served warm for dessert or cold for breakfast in the morning.


July 22, 2010

Lodi Apple Tart


Lodi apples are our first variety of summer apples to come in. The variety name lodi is pronounced "load-eye." While, according to my father, these apples are an old fashioned variety, no one (and I do mean no one) has ever heard of them, which leads me to believe that these old fashioned apples weren't ever very popular. Perhaps due to my affinity for the under-dog, or things that are less than common, I tend to enjoy lodis. They have a vibrant green color, very tart flesh, and a thin skin. And while these apples are not the best eating apple in the world, they make a mean pie/tart/sauce etc. Lodi's impossibly thin skin disintegrates in the oven, allowing you to avoid the hassle of peeling (which is my least favorite thing about baking with apples).

As with all summer apples, lodis should be kept in the refrigerator. Summer apples have a tendency to become mushy and dry (and generally unpleasant) in the summer heat.

Lodi Apple Tart
6-7 Lodi apples, or enough to make 8 cups of sliced apples
2 Tbsp honey
1/4 cup sugar
1 tsp cinnamon
1/4 tsp nutmeg
2 Tbsp butter
1 store bough pie crust

Caramel Sauce
(loosely adopted from Martha Stewart)
1/2 cup brown sugar
4 Tbsp butter
1/2 cup heavy cream
1/2 tsp vanilla extract
pinch of cinnamon (optional)

Preheat oven to 350 degrees. Core apples and cut into eighths. Pour honey, sugar, cinnamon and nutmeg over apples and toss together. In a skillet toss apple mixture and butter in for about 2-4 minutes until butter is melted and apples have softened slightly. Place your pie crust in a pie plate (any size will work) and add warm apple mixture. Place tart in oven for about 25 minutes, watching it carefully and making sure the pie crust doesn't burn. Remove pie and allow to cool slighly. To make caramel sauce place all ingredient for the sauce in a medium sauce pan and bring to a boil, allow the mixture to gently boil for one minute and then remove from heat, spoon over tart and serve warm.


July 12, 2010

Grilled Golden Plums with Honey Butter Sauce


Grilled stone fruit is one of my favorite things about summer. Grilling peaches, nectarines, or plums not only softens the fruit beautifully but also brings about a deeper sweetness. I decided to grill plums indoors on my grill pan (a wonderful gift given to me by my best friend!) so as to catch all the juice, and to be sure that none of my plums slipped between the grates of the outdoor grill. Seeing as how today was a scorcher, my family requested that these plums be served over vanilla ice cream. If you live anywhere near the Hartford, CT area, I would highly recommend trying Robb's Ice Cream in South Glastonbury, CT.

On the farm we grow small yellow plums called "Early Golds" that proceed the much more common "Shiro" plums. Both of these plums fall under the category of oriental plums; in addition to oriental plums we grow several varieties of Italian plums that ripen in late summer and continue into the fall. A lovely feature of early gold plums is that they are easy to separate from their pits when ripe, making them perfect for the grill. The honey-butter sauce adds both a wonderful saltiness from the butter, and a floral note from the honey.

Grilled Golden Plums with Honey Butter Sauce

1 pint of early gold plums
4 Tbsp salted butter
4 Tbsp honey
1 tsp molasses

Heat grill pan to medium heat. Cut plums in half and place on grill flesh side down for about 4 minutes, then flip to skin side and allow to cook for another 2 minutes. In a small sauce pan place butter, honey and molasses, once the butter has melted whip mixture with a whisk. Serve plums over ice cream and drizzle sauce over the top.


July 7, 2010

Peach and Raspberry Iced Tea


As long as I can remember my family has been quenching their thirst after a long day of work in the orchard with iced tea made by grandma. With access to an abundance of fruit that would go perfectly with iced tea, I decided to make something delicious to cool us off during this heat wave. Two of my favorite flavored iced teas are raspberry and peach, but I also adore the combination of these two fruits. Another wonderful thing about using both raspberries and peaches in this recipe is that you can certainly use fruit that is less than beautiful, or even over ripe. Raspberries and peaches are not known for their shelf life, so if you have some fruit that has become a little too ripe for your taste and a bit mushy, why not use it to make a refreshing treat?


Peach and Raspberry Iced Tea

1 quart raspberries
3 ripe peaches
1/2 cup sugar
8 cups of water
8 leaves of lemon balm

Wash fruit and slice peaches. Combine fruit and sugar in a medium saucepan and put on high heat until the fruit comes to a boil. Reduce heat and mash fruit (with a potato masher) so that all the juices are released. Bring the mixture in the saucepan back to a boil for about 3 minutes. Place the fruit "sauce" in a cheese cloth hung over a bowl to catch the juice (allow the fruit to hang there for about an hour, so that all juice can be collected, a gentle squeeze at the end might also help to release juice). Place the tea bags in the 8 cups of water and bring to a boil, then remove from heat and add the lemon balm. Combine the juice and tea then chill and enjoy!


This recipe would also be great with other teas, such as green or rooibos.